fbpx
Back to Top

8mm and Super 8 film reels

Before video film and digital technology there was the film reel. Many people have these stored away and don’t realise that they may be deteriorating. They potentially hold precious family footage with links to family heritage. Maybe they even contain valuable information about local or national history.

The history of 8mm and Super 8 film

Standard 8mm film (recognisable by the square sprocket holes) was developed to be cheaper and more portable than previous film types. One of the problems was that it had to be reversed in subdued light half way through filming, and then the film would need to be edited to erase the bright light caused by the reversal.

In order to avoid this, Super 8 film was released in the 1960s (recognisable by the smaller, rectangular sprocket holes). These were extremely popular for the amateur in the late 60s and 70s. The Super 8 cassettes were easier to use than the old method of having to thread the film into the camera. Film reels were mostly replaced by videotape in the 80s.

Originally the films were silent but in 1973 a sound version was released. Therefore, some regular 8mm and Super 8 film will be silent and some will have sound. We only transfer sound from Super 8 films. The way to recognise film with sound is an orange magnetic strip which runs along the opposite side to the sprockets.

Film deterioration

It was once thought that film was timeless and indestructable. However, in recent years it is becoming apparent that this is not the case. Ageing tape may crack, curl or ripple, and this is a sure sign that the film is deteriorating.

Some films, which have mainly been kept in sealed canisters and not allowed to breathe, develop ‘vinegar syndrome’, so called because of the noticable vinegar smell when the canister is opened. Cleaning and digitising is the only sure way to save the footage, but in some cases it is already too late.

Conversion projectors

The old method of converting film reels is with a film projector which projects the film onto a wall or screen or projection box. The image is the captured on a video camera. This can cause problems with speed irregularities, focus and flickering, and, if using an older projector, can even damage the film if the projector is worn or dirty.

By far the best method, and the method we use here at Photofriend, is a frame by frame scanner. This is recent technology and results in capturing more detail, therefore creating a clearer picture. During the editing stage we can stabilise the footage and enhance brightness, contrast, colour and sharpness.

The Photofriend Studio

At Photofriend all the films are cleaned prior to transfer, and the transfers are done with high quality HD equipment at maximum resolution. The editing is done with industry standard video editing software. We take the utmost care with your precious footage.

We are a New Zealand family owned and operated business and all the work is done in our video and film studio. We receive orders from all over New Zealand. Turnaround time depend on our workload but is usually 1 – 2 weeks.  If you’re interested please make an enquiry, use the online order form, or give us a call and talk to a friendly human!

Mould, fungus and water damage
Heavy blue pigment cast correction
Super 8 sound scanned and synced
Heavy mould on 8mm film reels
Mould on 8mm film

Is it time to digitise your audio cassette tapes?

Why do photos and slides fade and deteriorate?

Faded photos and discoloured slides

Photo prints, slides and negatives are made by using chemicals and chemical dyes. Unfortunately they are sensitive to light, moisture and changes in temperature. Their life span depends on the care taken with handling and storage, and also the type of film used and the process used to create the film.

Most casual photographers used regular colour slide and negative film which was processed in quick and convenient mini-labs and placed into cheap plastic sleeves.

Generally images over 20 years old will develop colour changes, lose detail and become grainy. The best way to store them is in a cool, dark, dry environment. However, all slides and photos will deteriorate over time. By far the best thing you can do is to have them scanned to digital images.

35mm slides

35mm slides, or transparencies, are small pieces of positive film encased in a 2 inch piece of plastic or cardboard. They were invented in 1935 and were in general use in the 1960s through to the mid 1990s. They were a popular way to create high-quality projected images.

The dyes used to make the slides are not stable and they slowly lose their colour, and eventually become transparent. For example, yellow dye is notorious for its rapid loss of colour which can then make skin colour look red or purple. This is more evident if low quality products and processes were used. In comparison, Kodak developed Kodachrome in 1936 which used a more stable dye process.

Excess light, heat and moisture will affect the dye colour layers in a slide and will encourage mould. If the film has been touched with fingers it can cause fungus to grow.

If you choose not to digitise them, it is advisable to keep them in polyester sleeves, then store them in a cool, dark, dry environement.

Photographs 

Loose photographs, and photos in albums, are affected by fluctuations in temperature, light and humidity. UV light affects the chemical makeup by breaking down the the chemical bond of the dye, causing colours to fade. Photos stored in albums may bond to the page or stick to the clear, protective sheet. Quality PVC-free plastic sleeves are the best solution. Then store them in a cool, dark dry environment – but not a garage as they may be exposed to gases such as nitrogen oxide and sulphur dioxide.

Loose photographs are prone to dust and scratches. Older photograph albums tend not to have protective sleeves or plastic covers and are prone to dust build up. This may cause abrasions on the photo surface when the album is handled.

Scanning and saving to digital images not only means that they are safe from further deterioration, but also means that they can be viewed and shared easily with family and friends.

Old home videos have a limited shelf life

Broken VHS tapeDo you have old home videos from 15 – 30 years ago safely stored away? Maybe a precious wedding video, baby’s first days, the kids growing up, a 21st birthday, an anniversary, or irreplaceable footage of your grandparents? Can’t watch them because you no longer have a VCR? Are you happy that they are being stored in the correct conditions? Would you like to watch them again on your TV, computer or digital device? It’s not too late…

Ageing video tapes have a limited shelf life and your cherished memories could be damaged due to a number of reasons. Here are some common causes of video tape deterioration:

  1. Mould – looks like white dust and can be cleaned with the correct procedure.
  2. Heat – can cause colour and sound quality deterioration. Colour can be improved but difficult to improve the sound quality.
  3. Water damage – can be saved if the tapes have been handled correctly after the event.
  4. Magnetic fields – depends on degree of exposure, but potentially could be saved.
  5. Cheap tape brands – could cause tape tension problems causing it to slip and come out of alignment. Tension can be restored in most cases.
  6. Sticky-tape syndrome – Video8 tapes are prone to this. Usually caused by mould – tapes can be cleaned but it’s a difficult procedure and they are prone to breakage.
  7. Old or faulty VCR machines – faulty heads could have caused ridges and tracking problems.
  8. Repeated playing, winding and rewinding – can cause loss of particles and magnetic data.
  9. Shredded, creased or broken tape. Can be fixed but a small amount of footage may be lost.
  10. Broken shell casing – casing can be replaced.

At Photofriend we come across these problems regularly with tapes from the mid-80s, the 90s and early 2000s. If required we have the expertise to deal with most of these issues. With each passing year your tapes will naturally deteriorate. If you are not prepared to take the risk, give us a call and we will do our very best to help you. View the comments from our happy customers on www.photofriend.co.nz/reviews

Here are some tips to keep your tapes safe:

  1. Store your tapes in a clean, dark environment.
  2. Avoid contamination from dust, fingerprints, cigarette smoke and airborne pollutants.
  3. Store them on a shelf and on end. They shouldn’t be stored flat for long periods.
  4. Don’t store tapes on top of televisions or electronic machinery, on window sills or near radiators/heaters.
  5. Keep them away from direct sunlight.
  6. Avoid contact with damp or water.

Why you should transfer your home videos – before it’s too late

Hand holding a variety of video tapes
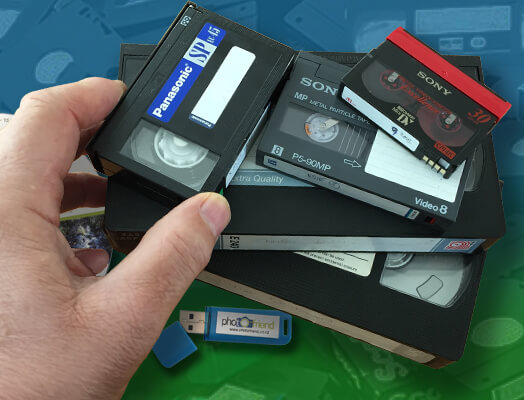
In this informative post we will be sharing some facts about why it may be time to transfer your old VHS, and other home videos, to either a DVD or USB device.

A little bit of history

The first VCR machines were developed by JVC in 1970 and were released in Japan in late 1976, and in the United States in 1977. Sony joined the video-recorder race by developing the Betamax format video machine which was released in Japan in May 1975 and in the USA in November 1975. Then VHS became the format of choice, making the Sony Betamax format obsolete.

Home video tape formats evolved into Video 8, Digital Video 8, Hi8, VHS-C and MiniDV. The invention of the digital optical disc (DVD) storage format, developed by Panasonic, Philips, Sony and Toshiba in 1995, as well as hard-drive technology, slowly made filming home-videos and recordings on these formats a thing of the past.

Japan's Funai Electric is reported to have stopped the production of VCRs in July 2016, thus becoming the world's last VCR manufacturer.

Why should I convert and transfer?

Camcorder and VHS tapes are old, analog recordings, affected by temperature, sunlight, magnetic fields and humidity changes. They begin to deteriorate after about a decade, depending on how they were stored and other factors.

VHS and other video tapes work by reading or recording a magnetized strip of tape that runs across the heads of a VCR machine or a video camera. The binder layer of tape that contacts the playback heads can suffer damage, such as tearing, sticking to the heads, mould infection, heat and humidity, which can hinder or even prevent proper playback. No video tape format lasts forever and will certainly degrade and become unwatchable over time.

Video tapes can last for various lengths of time depending on how they were stored and used. The generally acceptable time for VHS and other video tape formats to start to deteriorate and degrade is 10 to 20 percent over the course of 10 to 25 years.

Can I do the conversion myself using a cheap USB capturing device?

Yes, you can if you are not concerned about the final quality. There are a variety of options available, ranging from very cheap and to very expensive. These range from cheap, imported USB capturing devices to high-end transfer and conversion machines.

The cheap, imported USB capturing devices are mostly from China and have poor reputations. They have mixed reviews about resolution quality, sound problems, difficult operating instructions and sometimes faulty operating software. You can google the reviews and judge for yourself. A lot of these devices have been cloned and are sometimes not even worth the packaging they are sold in. We tested a few with extremely poor results.

Perhaps your camcorder or VCR has died and you need to get it fixed or replaced? You could try buying replacements from secondhand shops, Amazon or eBay and hope that when they arrive they still work and will last the distance. It’s a minefield out there. You most definitely will have to have plenty of time to do the job, and in some cases be prepared to spend a lot of money trying something that you might not have enough knowledge about. Then you will need to decide on editing software, DVD burning and file conversion formats etc. There is always the possibility of damaging your original tape with your family memories on it.

Or you could just let us handle all the stress and do it professionally for you. We don’t compress the videos or use cheap USB capturing devices - all our transfers are done with high quality equipment at maximum resolution. We do our editing with professional, industry editing software. You will get the best possible image quality that the tape will allow us to extract from it. Will you take the chance and wait longer to have them converted?

Please join us again in the following weeks and months when we will be talking about:

The main causes of tape decay and other problems

  • Mould and humidity
  • Colour distortion
  • VCR and camera faults
  • Broken tapes and cassettes
  • Tape formats
  • Magnetic particles
  • The VCR machine tape heads
  • Sticky-shed (sticky-tape) syndrome
  • The lubricant in the binder layer
  • Multiple recording and re-recordings
  • Multiple rewinding
  • Tracking problems
  • Sound distortion and drop-off

Until then…